How To Make A Rotating Swivel Joint At Home?
Learn how to create a rotating swivel joint at home with this comprehensive guide. Discover materials, tools, and techniques for DIY projects.
1. What Is a Rotating Swivel Joint?
A ROTATING SWIVEL JOINT (also known as a rotary swivel or rotary joint in some contexts) is a mechanical interface that allows one part to rotate freely while maintaining a sealed passage for fluid, air, or vacuum.
At its core, a swivel joint solves three fundamental problems:
-
Continuous rotation
-
Media transmission
-
Leak prevention
In industrial environments, swivel joints are precision-engineered components. However, for low-pressure, low-speed, non-critical applications, a simplified rotating swivel joint can be fabricated at home using commonly available materials.
2. Understanding the Working Principle Before You Build
Before attempting to make a rotating swivel joint at home, it is critical to understand how it works mechanically.
2.1 Basic Mechanical Principle
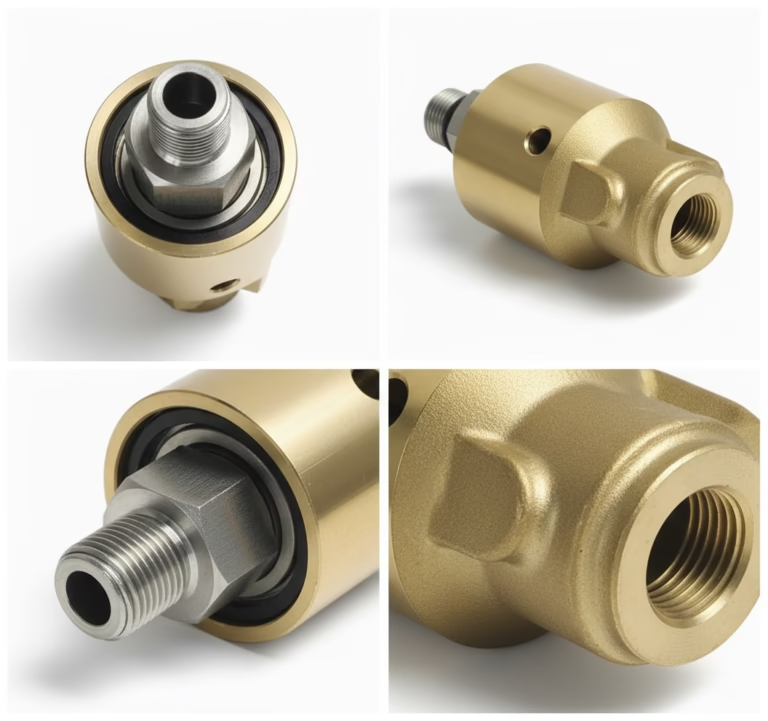
A rotating swivel joint consists of:
-
A stationary body
-
A rotating shaft or inner tube
-
A sealing interface between the two
-
Often, a bearing or bushing to reduce friction
The inner component rotates while the outer housing remains fixed. The seal prevents leakage, while the bearing ensures smooth rotation.
2.2 Why Professional Swivel Joints Are Complex
In industrial-grade rotating swivel joints:
-
Seal geometry is precisely engineered
-
Materials are selected for pressure, temperature, and chemical compatibility
-
Bearings are designed to handle axial and radial loads
A home-built swivel joint simplifies many of these aspects, which is why application limits must be clearly understood.
3. When Does It Make Sense to Make a Swivel Joint at Home?
From an engineering perspective, a DIY rotating swivel joint is appropriate only under strict conditions.
Suitable DIY Applications:
-
Low-pressure air lines
-
Water at household pressure
-
Light-duty hose management
-
Educational or experimental projects
-
Prototyping or concept validation
Not Suitable For:
-
Hydraulic oil systems
-
High-pressure fluids
-
High-speed rotation
-
Hazardous or hot media
-
Safety-critical equipment
Understanding these boundaries is essential for both trustworthiness and safety.
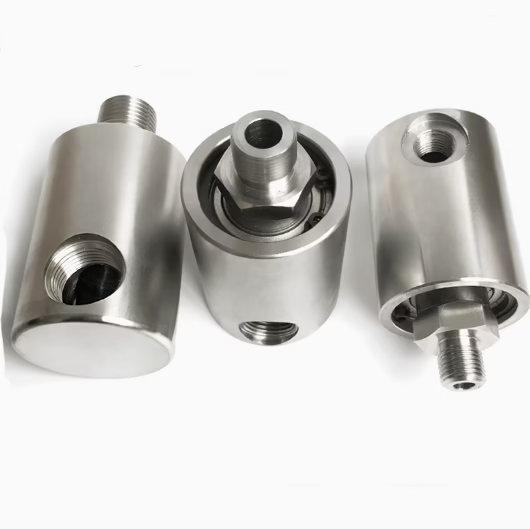
4. Tools and Materials You Will Need
To build a basic rotating swivel joint at home, you will typically need:
Common Materials:
-
Two metal fittings (brass or stainless steel preferred)
-
A smooth inner tube or pipe (rotating element)
-
O-rings (NBR or Viton for better sealing)
-
PTFE (Teflon) tape
-
Light grease or silicone lubricant
Optional Enhancements:
-
Bronze or polymer bushing
-
Small radial bearing (for smoother rotation)
-
Thread sealant
Tools:
-
Drill press or hand drill
-
Calipers (for measurement accuracy)
-
Wrenches
-
Sandpaper or polishing cloth
Precision during assembly directly affects the performance of the rotating swivel joint.
5. Step-by-Step: How To Make a Basic Rotating Swivel Joint at Home
Step 1: Design the Concept
Start by defining:
-
Media type (air or water)
-
Expected pressure
-
Rotation speed
-
Connection size
For most DIY builds, a simple coaxial design is often the best choice.
Step 2: Prepare the Outer Housing
-
Select a female threaded fitting or pipe coupling
-
Ensure the internal bore is smooth
-
Deburr and polish the internal surface to minimize seal wear
A smooth surface significantly improves sealing performance and service life.
Step 3: Prepare the Rotating Inner Shaft
-
Choose a tube or pipe that fits concentrically inside the housing
-
Machine or file shallow grooves for O-rings
-
Ensure the shaft surface is polished and free from scratches
This rotating element is the heart of your swivel joint.
Step 4: Install the Seals
-
Fit O-rings into the grooves
-
Apply a light lubricant to reduce friction
-
Avoid excessive compression, which causes rapid seal wear
In professional rotating swivel joints, seal compression is tightly controlled. In DIY builds, careful trial fitting is essential.
Step 5: Add Bearing or Bushing Support (Optional but Recommended)
To improve performance:
-
Install a bronze bushing or polymer sleeve between the housing and the shaft
-
Alternatively, use a small radial bearing if alignment allows
This step dramatically improves rotational smoothness and reduces seal load.
Step 6: Assemble and Secure
-
Insert the rotating shaft into the housing
-
Tighten retaining fittings carefully
-
Check that rotation is smooth and unrestricted
Do not overtighten—this is one of the most common DIY failures.
Step 7: Pressure and Leak Testing
Before use:
-
Test with air or water at low pressure
-
Gradually increase pressure
-
Inspect for leaks, friction, or binding
Never test a DIY rotating swivel joint beyond its intended operating range.
6. Common Mistakes When Making a Rotating Swivel Joint at Home
Based on real-world maintenance and engineering experience, the most frequent issues include:
-
Over-compressing O-rings
-
Poor concentric alignment
-
Using incorrect seal materials
-
Ignoring rotational friction
-
Applying the joint in unsuitable conditions
Avoiding these mistakes significantly improves reliability.
7. Performance Limitations of DIY Rotating Swivel Joints
It is important to be transparent about limitations:
| Parameter | DIY Swivel Joint | Industrial Swivel Joint |
|---|---|---|
| Pressure | Low | Medium to High |
| Speed | Low | High |
| Seal life | Limited | Extended |
| Safety margin | Minimal | Engineered |
| Certification | None | ISO / Industry Standards |
This comparison highlights why professional rotating swivel joints are indispensable in industrial systems.
8. Safety Considerations and Engineering Responsibility
From a trust and compliance standpoint:
-
Never use a DIY swivel joint for compressed gas above household pressure
-
Do not use with flammable or hazardous fluids
-
Always wear eye protection during testing
-
Treat DIY joints as temporary or experimental solutions
Responsible engineering always prioritizes safety over convenience.
9. When to Choose a Professional Rotating Swivel Joint Instead
If your application involves:
-
Continuous operation
-
High pressure
-
High RPM
-
Production equipment
-
Customer or operator safety
A professionally manufactured ROTATING SWIVEL JOINT is not optional—it is essential.
Industrial swivel joints are designed using validated engineering calculations, tested materials, and controlled manufacturing processes that cannot be replicated in a home workshop.
FAQs About DIY Swivel Joints
Q1: Can I create a rotating swivel joint using common household materials?
A: Yes! A simple swivel joint for irrigation systems or garden hoses can be made using PVC pipes, fittings, and lubricant. Here’s how:
Materials Needed:
1/2-inch PVC pipe (12 inches), PVC elbow fitting,1/2-inch PVC male adapter
Silicone lubricant
Thread seal tape
Steps:
Cut the PVC pipe into two equal parts.
Attach one end to the elbow fitting and secure with seal tape.
Insert the male adapter into the opposite end and lubricate the connection.
Test the rotation to ensure smooth movement.
Q2: What’s the best way to make a durable swivel joint for machinery or robotics?
A: For heavy-duty applications, use metal components like bearings and steel rods:
Materials Needed:
Steel rod (1/4-inch diameter)
Ball bearing (608ZZ size)
Aluminum tubing
Epoxy resin
Welding equipment (optional)
Steps:
Cut the steel rod to the desired length.
Press-fit the ball bearing onto the rod.
Slide the aluminum tubing over the bearing to create a housing.
Secure with epoxy or weld for stability.
Q3: Can I design a swivel joint using a 3D printer?
A: Absolutely! 3D printing offers flexibility for custom shapes and prototypes:
Tools & Materials:
3D modeling software (Fusion 360, Tinkercad)
PLA or ABS filament
3D printer
Small ball bearings (optional)
Steps:
Design two interlocking parts: a rotating shaft and a stationary housing.
Include slots for bearings to reduce friction.
Print both parts and assemble them with lubricant.
Test and adjust for smooth rotation.
Q4: How to prevent water/air leakage from homemade rotary joints?
A: Double O-ring seal: Install two O-rings between the rotating shaft and the fixed sleeve, and fill the middle with lubricating grease (such as Vaseline) to form a double barrier.
Teflon tape: Wrap around threaded connections to enhance sealing (suitable for fluid systems).
Epoxy resin reinforcement: Apply epoxy resin to the joints of nonrotating components to prevent small gaps from leaking.
Common error: Using a single seal or not reserving expansion space (recommended to reserve a gap of 0.1mm).
Q5: What should I do if the bearing installation is improper and causes the rotation to stall?
A: Concentricity calibration: Use a dial gauge to adjust the concentricity between the shaft and the fixed sleeve (with an error of<0.05mm).
Bearing preloading: Lightly press the bearing onto the fixed sleeve to avoid being too tight or too loose (ideal state: slight resistance but no shaking during rotation).
Lubrication optimization: Use lithium-based grease (high-temperature resistant) or silicone oil (low-friction) to minimize excessive resistance.
Tool recommendation: Laser centering instrument (high precision) or simple V-block + ruler (entry-level).
Conclusion
Making rotary joints at home is a deep practice that combines creativity and technical skills. Through the step-by-step teaching in this guide, not only can you master mechanical design skills from basic to advanced levels, but you can also reach a global audience with professional knowledge.
Summary of Core Values
Breakthrough in technological sovereignty
Breaking through industrial standard limitations: customizing non-standard rotary joints for special scenarios such as deep-sea exploration and high-temperature furnaces
Case evidence: A research team solved the problem of commercial products being unable to withstand the high pressure of 200MPa by using self-made titanium alloy rotary joints
Cost control revolution
Data comparison: The unit price of industrial-grade rotary joints (such as Eaton 360 series) is $450 vs the self-made cost of $120 (using 3D printing+bearing combination)
Economic Model: When the annual procurement volume exceeds 500 pieces, a self-made solution can save $165000 per year (based on internal data from a certain automation equipment manufacturer)
By combining theory with practice, you will not only become an expert in rotary joints but also gain an advantage in the field of intelligent manufacturing. Start your DIY journey now! AA