Rebuild Deublin Rotary Union: Complete Guide, Cost Savings & OEM Alternatives
What is a Deublin Rotary Union?
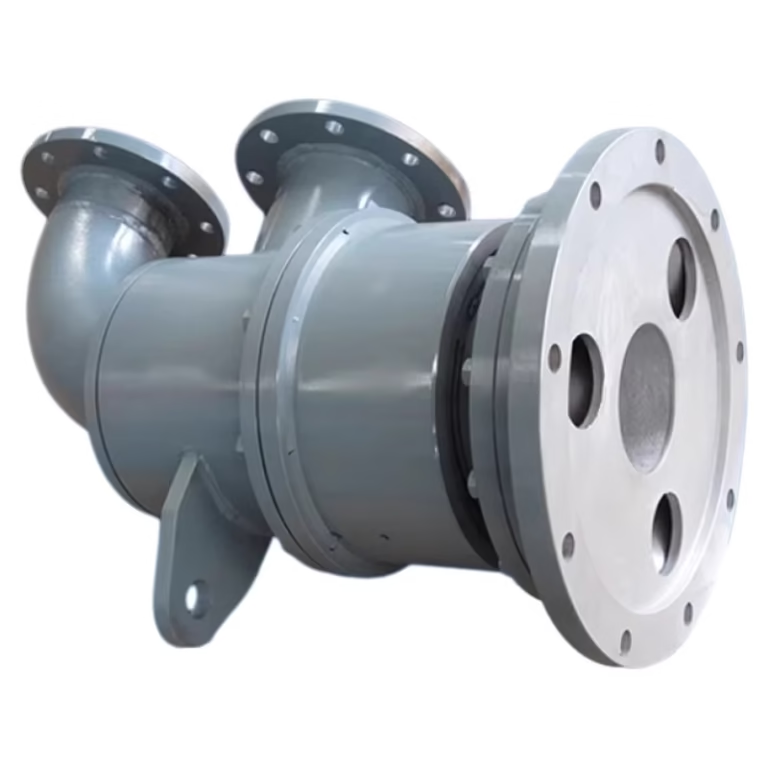
A Deublin rotary union, also known as a rotary joint or swivel union, is a mechanical device that enables the transfer of fluids (such as water, oil, steam, or coolant), gases, or electrical signals between a stationary and a rotating part of a machine. It serves as a crucial connection point, allowing for the seamless flow of these substances while accommodating the rotational movement.
Rebuild Deublin rotary union restores its efficiency and extends its lifespan, saving costs compared to replacement.
Signs that Indicate a Need to rebuild the Dublin rotary union
1. Leakage
One of the most obvious signs that a Deublin rotary union needs rebuilding is leakage. This can manifest as fluid or gas seeping from the union. Leakage can occur due to worn-out seals. Over time, the constant rotation and the pressure exerted on the seals cause them to degrade.
2. Abnormal Noise
Unusual noises during the operation of the rotary union are also a red flag. Grinding, squeaking, or rattling sounds can be heard when the bearings are damaged or if there is misalignment within the union.
3. Difficulty in Rotation
If the rotating part of the union does not turn smoothly, it could be a sign of trouble.
4. Increased Vibration
Excessive vibration is another symptom of a rotary union in need of rebuilding. Vibration can be caused by unbalanced components, worn-out bearings, or misalignment.
Benefits of Rebuild Deublin Rotary Union
1. Cost – Savings
Rebuilding a Deublin rotary union is often significantly more cost-effective than purchasing a brand-new one. New rotary unions can be quite expensive, especially those with high-performance specifications. By rebuilding, you only need to replace the damaged or worn-out components.
2. Extended Lifespan
A properly rebuilt rotary union can have a significantly extended lifespan. When the worn-out parts are replaced and the union is serviced, it can operate as efficiently as a new one for a long time. This means that the equipment in which the rotary union is installed can continue to function without the need for frequent replacements.
3. Improved Equipment Performance
Rebuilding a rotary union can enhance the overall performance of the equipment. New seals can prevent leakage, ensuring that the fluids or gases are transferred precisely as required. Well-maintained bearings can provide smooth rotation, reducing friction and energy consumption.
4. Environmental Benefits
Choosing to rebuild a rotary union instead of buying a new one is also environmentally friendly. Manufacturing new rotary unions requires the extraction of raw materials, energy-intensive production processes, and transportation. By rebuilding, you are reducing the demand for new products, which in turn reduces the environmental impact associated with manufacturing.
Our Factory Rebuild Capability
1. 10+ Years Rotary Union Manufacturing Expertise
We are a professional rotary union manufacturer in China, specializing in:
- High-speed rotary unions
- Water rotary joints
- Steam and thermal oil rotary unions
- Multi-passage rotary unions
Unlike trading companies, we are a direct OEM factory, with deep experience in both manufacturing and rebuilding rotary unions, including Deublin-compatible models.
2. Advanced Repair & Rebuild Process
Our rebuild Deublin rotary union service follows strict industrial standards:
2.1: Disassembly & Inspection
- Full inspection of rotor, stator, and sealing surfaces
2.2: Precision Machining
- CNC reconditioning of worn surfaces
- Restoration of critical tolerances
2.3: Seal & Bearing Replacement
- Use of high-grade materials (carbon graphite, SiC, TC)
2.4: Assembly & Dynamic Balancing
- Ensures stability in high-speed operation
2.5: Pressure & Leak Testing
- 100% testing before delivery
This process ensures rebuilt units achieve performance close to new products.
3. Strong Manufacturing Infrastructure
Our factory is equipped with:
- CNC machining centers
- High-precision grinding machines
- Dynamic balance testing equipment
- Pressure & leakage testing systems
Every rebuilt rotary union is tested under real working conditions, ensuring reliability.
4. OEM Alternative Solutions (Key Competitive Advantage)
In many cases, rebuilding is not the only option. We also provide:
- Direct replacement rotary unions (Deublin interchangeable)
- Same installation dimensions
- Equal or improved sealing performance
- 30–50% lower cost
This gives customers flexibility:
👉 Rebuild existing units OR
👉 Replace with high-quality Chinese OEM alternatives
5. Global Service Experience
We have served customers in:
- USA
- Europe
- Southeast Asia
- Middle East
Applications include:
- Steel mills
- Paper machines
- Printing equipment
- CNC machining centers
Our experience ensures we understand real industrial working conditions, not just theory.
Step-by-Step Rebuild Dublin Rotary Union Process
Step 1: Disassembly
1. Safety First
Before starting the disassembly, ensure that the machine is turned off and all power sources are disconnected. This is crucial to prevent any accidental start-up during the process, which could lead to serious injury. Also, wear appropriate personal protective equipment, such as safety glasses and gloves, to protect yourself from any sharp edges or potential contaminants.
2. Marking Components
Use a permanent marker or a punch to mark the position of each component before removing it. This will make the reassembly process much easier, as it will help you to put the parts back in their original positions. For example, mark the alignment of the housing halves, the position of the bearings on the shaft, and the orientation of the inlet and outlet ports.
3. Removing Fasteners
Begin by using the appropriate wrenches or screwdrivers to remove the nuts, bolts, and screws that hold the Deublin rotary union together. Start with the outermost fasteners and work your way inwards. When removing nuts and bolts, be careful not to round off the corners. If a fastener is stuck, you can try applying a penetrating oil and letting it sit for a while before attempting to remove it again.
4. Taking Apart the Housing
Once all the fasteners are removed, carefully separate the housing of the rotary union. Some housings may be held together by snap-fits or dowel pins in addition to fasteners. If this is the case, use a flat-head screwdriver or a pry bar (gently) to carefully separate the parts.
5. Removing Seals and Bearings
After the housing is open, the seals and bearings can be removed. Seals are often held in place by a retaining ring or a snap ring. Use needle-nose pliers to carefully remove the retaining ring, and then gently pry out the seal. When removing bearings, if they are press-fitted onto the shaft, a bearing puller will be required. Attach the bearing puller to the bearing and carefully apply force to pull the bearing off the shaft.
Step 2: Cleaning and Inspection
1. Cleaning the Components
Use a suitable cleaning solvent, such as mineral spirits or acetone, to clean all the components. Soak the parts in the solvent for a few minutes to loosen any dirt, grease, or contaminants. Then, use a brush, such as a wire brush or a nylon brush, to scrub away the remaining debris. For parts with hard-to-reach areas, like the internal passages of the shaft, a pipe cleaner or a small-diameter brush can be used. After cleaning, rinse the components with clean water (if the solvent allows) and dry them thoroughly with a clean cloth or compressed air.
2. Inspecting Seals
Examine the seals carefully for any signs of wear, such as cracks, tears, or flattening. The edges of the seals should be smooth and free from any damage. If the seal has lost its elasticity or has visible signs of degradation, it should be replaced. In the case of mechanical seals, check the flat surfaces for scratches or uneven wear. Even a small scratch on the sealing surface can lead to leakage.
3. Checking Bearings
Inspect the bearings for signs of wear, such as pitting, scoring, or excessive play. Rotate the bearing by hand to feel for any roughness or unevenness. If the bearing feels rough or makes a grinding noise when rotated, it is likely damaged and needs to be replaced. Also, check the bearing races for any signs of damage, such as cracks or corrosion.
4. Examining the Housing and Shaft
Look at the housing for any signs of cracks, dents, or corrosion. Cracks in the housing can lead to leakage and structural instability. Check the mating surfaces of the housing for any damage or deformation that could affect the seal. For the shaft, measure its diameter at different points using a micrometer or a vernier caliper to check for any signs of wear or bending. If the shaft is bent, it can cause misalignment and premature failure of the rotary union. Also, inspect the internal passages of the shaft for any blockages or damage.
Step 3: Replacement of Worn-out Parts
1. Selecting Replacement Parts
When choosing replacement parts, ensure that they are of high quality and compatible with the model of the Deublin rotary union. Refer to the manufacturer’s specifications and part numbers to select the correct seals, bearings, gaskets, and other components.
2. Replacing Seals
Before installing the new seals, apply a thin layer of lubricant to the sealing surfaces and the outer diameter of the seal. This will help to ease the installation process and ensure a proper seal. Carefully insert the new seal into its housing, making sure it is seated properly.
3. Installing Bearings
If the bearing is a press-fit type, heat the bearing slightly (using a bearing heater or a warm oil bath) to expand it. This will make it easier to install onto the shaft. While the bearing is still warm, carefully slide it onto the shaft until it reaches the desired position. Make sure the bearing is installed with the correct orientation. If the bearing has a marked side, it should face the correct direction as specified in the manufacturer’s instructions. Once the bearing is in place, allow it to cool down, and it will shrink – fit onto the shaft. For bearings that are installed in a housing, use a bearing installer or a suitable tool to press the bearing into the housing until it is fully seated.
4. Replacing Other Components
Replace any other worn-out components, such as gaskets and O-rings. When installing gaskets, make sure they are properly aligned, and there are no wrinkles or gaps. Apply a small amount of gasket sealant (if required) to ensure a tight seal. For O-rings, check that they are the correct size and material for the application. Install the O-ring into its groove, making sure it is not twisted or damaged during the installation.
Step 4: Reassembly
1. Preparing the Components
Before starting the reassembly, make sure all the components are clean and in good condition.
2. Installing the Bearings and Seals in the Housing
Place the new bearings into the housing, making sure they are properly aligned. If there are multiple bearings, install them in the correct order and position. Then, install the new seals around the bearings and the shaft, ensuring that they seat correctly and the sealing surfaces are clean.
3. Reassembling the Housing
Carefully align the two halves of the housing and start installing the fasteners. Tighten the nuts, bolts, and screws gradually and evenly, using a torque wrench to ensure that the correct torque is applied.
4. Connecting the Inlet and Outlet Ports
Install the appropriate fittings or connectors onto the inlet and outlet ports of the rotary union. Make sure they are tightened properly to prevent leaks. If there are any hoses to connect, attach them securely to the ports.
5. Final Checks
Before testing the rebuilt rotary union, perform a final visual inspection. Check that all the components are in place, the fasteners tightened, and there are no loose parts. Make sure the shaft rotates freely by hand. If there is any resistance or abnormal feeling, re-check the assembly to identify and correct the problem.
Step 5: Testing and Commissioning
1. Pressure Testing
Connect the rotary union to a suitable pressure source, such as a hydraulic pump or a compressed air system. Gradually increase the pressure to the rated pressure of the rotary union and hold it for a few minutes. Check for any signs of leakage around the seals, gaskets, or connections. If there are any leaks, identify the source and repair it. This may involve tightening the fasteners, replacing a faulty seal, or reinstalling a connection.
2. Leakage Testing
In addition to pressure testing, perform a leakage test using a sensitive leak – detection method. This can be done using a leak-detection spray or a bubble solution. Apply the solution around the seals and connections and look for the formation of bubbles, which indicates a leak. Another method is to use a helium leak detector for more precise detection, especially in applications where even a small leak is unacceptable.
3. Operation test
Rotate the shaft of the rotary union at the expected operating speed for some time, usually 15 – 30 minutes. Monitor the operation for any abnormal noise, vibration, or heat generation. Abnormal noise could indicate misalignment, a problem with the bearings, or a loose component. Excessive vibration can also be a sign of misalignment or unbalanced parts.
4. Fluid Flow Testing
If the rotary union is designed to transfer fluids, conduct a fluid flow test. Ensure that the fluid is flowing smoothly through the union without any blockages or restrictions. Measure the flow rate and compare it with the expected values.
5. Final Commissioning
Once all the tests are completed and the rotary union has passed the inspection, it can be commissioned for normal operation. Reinstall the rotary union into the machine and connect it to the relevant systems. Monitor the performance of the rotary union during the initial startup and operation to ensure that it is working properly. Keep records of the testing and commissioning process for future reference.
Mistakes in rebuild deublin rotary union Process
1. Improper Installation
One of the most common mistakes during the rebuilding of a Deublin rotary union is improper installation. This can include misaligning the components, such as the shaft and the housing. Misalignment can cause uneven wear on the seals and bearings, leading to premature failure. For example, if the shaft is not installed straight within the housing, the seals may not make proper contact, resulting in leakage. To avoid this, always use alignment tools during installation. There are laser alignment tools available that can accurately measure and adjust the alignment of the shaft and the housing. Additionally, carefully follow the manufacturer’s installation instructions, which often include specific alignment tolerances.
2. Using the Wrong Tools or Materials
Using incorrect tools can also cause problems. For instance, using a wrench that is too large or too small for a nut or bolt can strip the threads, making it difficult to tighten or loosen the fastener properly. In terms of materials, using low-quality replacement parts, such as seals or bearings that are not compatible with the Deublin rotary union, can lead to poor performance.
3. Inadequate Cleaning
Failing to clean the components thoroughly before reassembly is another common error. Residual dirt, grease, or contaminants can interfere with the proper functioning of the rotary union. For example, if dirt particles get trapped between the seal and the shaft, they can cause the seal to wear out faster. Make sure to use the right cleaning solvents and methods.
4. Over-Tightening or Under-Tightening Fasteners
Applying too much torque when tightening nuts and bolts can damage the components. It can cause the housing to crack or distort, which may lead to leakage or misalignment. On the other hand, under-tightening can result in loose connections, also leading to leakage and potentially causing the components to come apart during operation.
Common Issues and Troubleshooting of the rebuild of the Dublin rotary union
Leakage Post-Rebuild
Often caused by improper seal seating or misalignment. Recheck concentricity using dial indicators.
Excessive Vibration
Worn bearings or an imbalance in the rotor. Verify bearing installation and rotor balance.
Reduced Speed Capacity
Contaminated lubrication or incorrect grease type. Flush and relubricate with manufacturer-approved grease.
When Should You Rebuild vs Replace?
Choose Rebuild If:
- Housing and shaft are still in good condition
- Only worn seals or bearings require replacement
- You need a fast, cost-effective solution
Choose Replacement If:
- Severe corrosion or structural damage
- Repeated failure after repair
- Need a performance upgrade
Why Choose Our Rebuild Service?
- ✔ Factory-direct service (not a middleman)
- ✔ Engineering-level repair capability
- ✔ OEM-compatible parts
- ✔ Strict quality testing
- ✔ Competitive pricing
- ✔ Fast turnaround
We combine manufacturing + repair expertise, which most service providers cannot offer.
Conclusion
Rebuilding a Deublin rotary union is a practical and cost-effective way to extend equipment life and reduce downtime. While OEM repair services exist, a qualified manufacturer like us can provide:
- Equivalent or better performance
- Faster delivery
- Significant cost savings
If you are looking for a reliable partner for rebuilding Deublin rotary union services or high-quality replacements, our factory is ready to support your operation.
Call to Action
👉 Contact us today to:
- Evaluate your rotary union condition
- Get a rebuild quotation
- Explore OEM replacement options